I've been telling you what a fabulous time my Dazzling Demos and I had at OnStage Milwaukee…
Well the card I have for you is a direct result of that!
I haven't tried this fun–albeit messy–Shaving Cream (background) Technique in YEARS!!!
But it was demoed at OnStage–inspiring [I would assume] LOTS OF DEMOS to go Retro!!
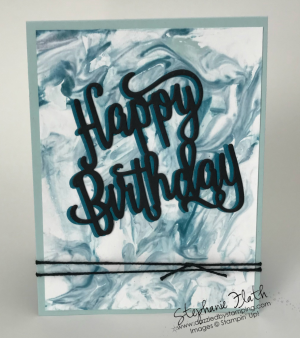
Here's my offering:
I have SO MUCH TO SHARE WITH YOU ABOUT THIS CARD!!!!
Ok, this is gonna sound completely ludicrous, but besides the mess (you know I'm a stamp-n-go kinda girl), the OTHER reason I hadn't tried this technique in a long time was the SMELL!!
Getting a tad bit personal here, but I don't use shaving cream for my legs; I use shower gel or just my shampoo.
Well, I dunno if I was just closed-minded years ago or if shaving cream has just come a long way in that amount of time…
but when I went to the dollar store looking for a stinky can of Barbasol, I FOUND A RASPBERRY-SCENTED CAN OF LADIES' SHAVING CREAM!!
AAAAHHHH!!! PRAISE THE LORD!!! 😀
I don't mind the scent at all!
Yah. Scent is a big thing for me.
Ok, so quick run-down of the Shaving Cream Technique:
(needs: shaving cream, 2 non-porous pans or surfaces, 1-3 colors of ink refills, Paper Piercing Tool or toothpick, cardfront, empty gift card or similar, kleenex or baby wipes for potential mess)
- Spray a layer of shaving cream on a non-porous surface of some kind that's bigger than your cut cardfront. (Don't use a full card; attach this piece to a card base later.)
- Drop a few drops of each ink refill color randomly on the shaving cream.
- Squiggle your Paper Piercing Tool through it to swirl the color around a bit.
- Press the front of your cardfront onto the shaving cream so the whole front is pressed.
- Lift it up–it automatically starts curling from the moisture.
- Lay the cardfront down in the 2nd pan; hold a corner of the cardfront and scrape the shaving cream off with the gift card.
- Scrape off the gift card on the edge of the pan and continue that process until the shaving cream is all removed.
- Let the cardfront dry.
- **STEPS 4-8 TYPICALLY CAN BE CONTINUED FOR 3 or 4 CARDS (do several while you have the mess) BEFORE THE CREAM IS JUST TINTED RATHER THAN SWIRLED.
**HOWEVER, I did 9 of them at one time without adding more drops of color (which is also an option) just by scooping the gift card scrapings back into my first pan.
Every background will be different, regardless of the number of times you do it!
OK NOW–may I just say something about the HAPPY BIRTHDAY itself???
How cool is that shadow???
Thank you MULTIPURPOSE ADHESIVE SHEETS!!! (pg 203 in the full catalog)
If you've never tried these? FABULOUS!!!
Shadowed Happy Birthday:
- 2 different colors/pcs of cardstock (for this HB thinlit, I used 3" x 3 1/2" to make the most use of the Adhesive Sheets as possible; they come 6"x12")
- 2 of those same size pcs of Multipurpose Adhesive Sheets
- put the adhesive on the back of each cs (throw away the WORD side!)
- run thru the Big Shot with thinlit on top of colored side
- peel the backing of the adhesive sheet off the die-cut pc to adhere to project
- offset the 2nd layer for a shadowed look
NOW I have to give a shout-out to [someone] in my Monday morning Stampers Club!
When I was showing this Shadowed Happy Birthday this month at my clubs (different card to show you later), I was adhering the 2 layers in my hands in the air.
HELLO!!!
Don't remember which brilliant stamper decided to lay down the bottom layer first; then remove the backing from the top one and offset it directly on the card!!
Hmmmm. How did I not think of that?!
Thank you, brilliant stamper friend!!
We are forever in your debt!!
Anyone remember who started this??
Please tell me!
She deserves a sucker! 😉
Ha!! No stamps!! But here's the rest of the supplies:
(Colors are retiring, but the rest is sticking around)
Have an amazingly gorgeous sunny day!!!


Leave a Reply