Take 2….
;)
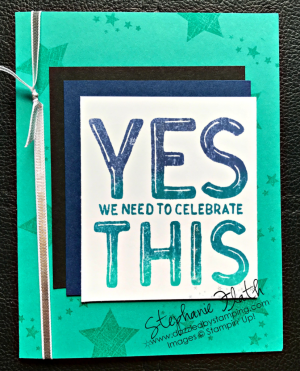
I have another sample from my baby wipes technique class!
When making a custom ink pad with a baby wipe and your ink refills, remember there are a few things you need to know:
- Use stamps that are BOLD or have a lot of detail. (See my last sample here.)
- Choose 3 colors that are light, medium and dark….They don't have to be in the same color palette (ie: all blues or greens, etc), but there needs to be contrast.
- Make sure your custom inked pad is BIG ENOUGH for the stamp you're using; you'll want to stamp it up in the same basic spot on the "pad" so the colors are not muddied.
- When dripping the ink on the baby wipe, it should wick together–leaving NO white space.
(white space = non-inked stamp)
I LOVE that we have a big bold words set–perfect for this technique!!
Here's everything we used:
One last tip specific to this Great Big Greetings stamp set (and any other photopolymer sets.)….
The photopolymer material is very easy to cut.
So you can customize the stamp itself.
I loved this set, but didn't want HECK on my cards.
I've heard of another who didn't want THIS.
[Btw, "YES we need to celebrate" would be perfect for a party invite!]
You could actually cut both "heck" and "this" off–and the beautiful thing about photopolymer is you can easily piece it back together on the block if you change your mind how you'd like the stamp to be!
Thanks for stopping by!
Have a great day!


Leave a Reply