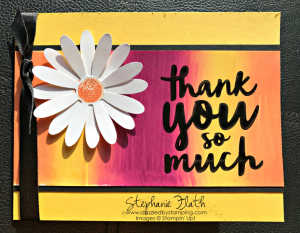
I'm SO happy Stampin' Up! brought glossy cardstock back!!
And I'm IN LOVE with everything about this card:
The bright colors…
the beloved Daisy…
the shimmery ribbon…
the big, bold thank you so much!!!!
I LOVE IT!!!
My customers at my Techniques Class did, too!
So this technique I believe is called the baby wipe SWIPE.
It's my favorite.
You need a baby wipe, glossy cardstock, ink refills and a sturdy/rigid piece of plastic or non-porous material.
I used an embossing folder, and I've used a credit/gift card for a smaller piece in the past.
Baby Wipe Swipe Technique:
- Drape baby wipe over the [folded] edge of embossing folder.
- Start on one end of the baby wipe and squeeze ink drops onto the baby wipe edge, making sure the drops are touching each other–over about 1/3 of the edge.
- Switch to a different color and repeat step 2.
- Switch to a 3rd color and repeat step 2, finishing the rest of the baby wipe edge.
- With scrap paper on your work surface and glossy cardstock on top, hold the baby wipe tight onto the embossing folder and swipe the color onto the glossy cs. [start just off the cs and end off of it to avoid leaving lines] Continue swiping in the same spot, same direction until it's covered as desired.
- If your baby wipe edge isn't as long as your glossy cardstock, turn your cs 180 degrees and repeat step 5 to cover. (That's how on my sample colors go Tangerine Tango, Daffodil Delight, Berry Burst, Daffodil Delight, Tangerine Tango.)
- Let dry for a bit, and stamp greeting or design in Basic Black.
- Let dry before finishing your card.
Class Info:
- Sign up here for my next Techniques Class–Window Sheets (8/29.)
- For this month's Bringing Birthdays Back Stack, RSVP here (8/24.)
- I scheduled a Mommy & Me Class 8/31; there's one spot left for mom+1 or maybe mom+2. Click here to take that last spot.
- I want to schedule one more Mommy & Me–either Friday, 8/11 or 8/25. (I already have a mom+1 interested! Do you want to join them??) Please text or email me if one of those works for you!
Thanks for stopping by today!
Have a fabulous day!!

Leave a Reply