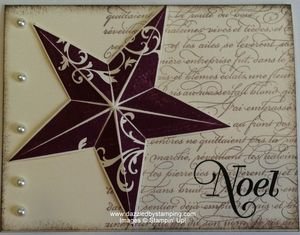
…Or more like POPPED up!
Can you tell we have a little 3-D action going on here with the Christmas Star?
I LOVE IT!!
It's just a tad time-consuming.
But really only because you have to hand cut out the star.
(I'm SO spoiled by punches and framelits!!)
Here's how you POP it after you cut it out:
I used my Simply Scored Scoring Tool, but you could use a bone folder along with your Paper Trimmer (track) OR the Envelope Punch Board scoring track.
- Align one of the line images of a point on the star with a track on the Scoring Tool (tip and coordinating opposite valley).
- Score that line with the Stylus from tip to valley.
- Turn to the next point on the star and repeat steps 1 & 2.
- Continue until each point is scored.
- Fold on the full score line so you still see the stamped star.
- Continue until all points have been folded.
- Now fold 2 adjacent points on the star and pinch those points together to make the valley between them fold down, unseen.
- Continue with the next adjacent point and valley until all points are popped and valleys are tucked down.
- Flatten as much as desired.
- To attach to a card, I attached a Dimensional underneath each point as close to the tip as possible without being seen.
Don't worry, Keana. I'll SHOW you!
In fact, you'll be doing it on a different card at my Christmas Stamp Camp Saturday.
CANNOT WAIT!!
Have a great week!
Remember,
if you can fall in love with a project, you can learn to
create it! Here to help you channel your inner Creative
Genius…
Steph
LIKE me on Facebook.
Follow me on Pinterest.
Subscribe to my FREE newsletter, and receive my "5 Tips for Making Fabulous Hand-Stamped Creations."

Love the card!!
Oh my goodness, I got to step #2 and thought to myself, "I'll just have to have Steph SHOW me!" and then I saw your comment! Haha! Cannot wait for Saturday. This is a beautiful card!! I love it!
So BEAUTIFUL!