I think this may end up being one of the most amazing parts of our trip!
I can't wait!
I came back to the Broadway Birthday bundle to show you how we used SO MANY Metallic Pearls this month!
I came up with this idea for 2 reasons:
- I wanted to use the negative space of my thinlit.
- I had all club orders shipped directly to my customers, so I didn't have their bags to put their thank yous in.
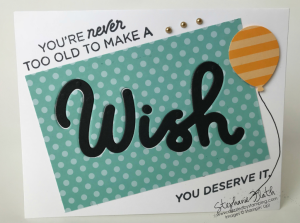
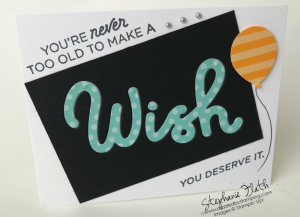
So one of their projects was double cards:
I used several different colors with my clubs this month.
It's a fun process!
KEY: YOU MUST KEEP ALL PIECES FROM THE THINLITS!!
(We used a piece of scrap paper folded twice to card size to hold them all.)
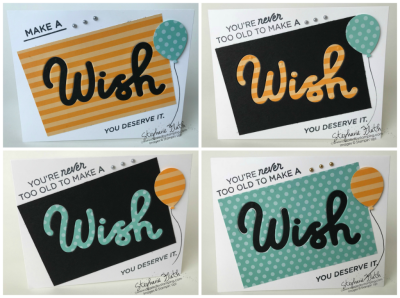
Here's what would be 2 separate clubs or split colors within a club:
Top 2 go together.
Bottom 2 go together.
Here's what you need to make all 4:
- 2 sheets of Whisper White cs (or whatever your card base choice is.)
- 2 6×6 sheets of coordinating color DSP
- 2 4 1/2" x 6" pieces of Basic Black cs
- 1 Multipurpose Adhesive sheet (cut lengthwise in half–at 3", then the other way at 4 1/2" twice. You'll have 2 3"x3" scraps left. **If you're making LOTS of these, cut off the 3" end first to use for another set.)
Cut 6×6 DSP in half; then cut again at 4 1/2".
You'll have a 3" x 1 1/2" piece to use with the coordinating DSP to punch out the balloons.
- Attach adhesive sheet to back of black and DSP before running through the Big Shot with "Wish".
- Remove the backing from the negative space first and place that on card.
- Remove backing from the oppositve W (it's separate from "ish") and place that inside the negative space; do the same with "ish" and then again with the dot on the "i".
- Take the SAME color as the negative space for the loop on the "h" and center of the "s". It's very tiny!
Color combos I've used:
- Coastal Cabana/Mango Melody (this one)
- Bermuda Bay/Poppy Parade
- Calypso Coral/Petal Pink (it has a peach tint)
- Blueberry Bushel/Call Me Clover
- Highland Heather/Pear Pizzazz
Don't forget about ALL the specials going on!!!
I used the Color Collections of DSP in this project.
I'm offering it as a free gift with a $75 purchase using my hostess code.
+
Extra Special:
WHILE I'M GONE (7/19 – 7/29)…with every $50 you order using hostess code UK7BCY3D, I'll send you a $5 gift certificate to be used in August.
Have a great week!
**Truth in advertising: less than 1% of all Stampin' Up! Demonstrators earn the incentive trip each year.


Leave a Reply