Dazzled By Stamping

  • Home
  • Shop Online
    • ALL
    • Online Exclusives
    • Last Chance Products
    • Kits
    • Paper Pumpkin–Prepaid & Past
  • Browse Catalogs
    • Current 2025-2026 Annual Catalog
    • WISH LIST–print your own!
  • Classes & Events
    • Calendar
    • Dazzling Card Club
    • Stampers Club
  • Join the Fun
    • Join my Team!
    • Dazzling Demos Team Benefits
  • Subscribe
    • Email Mailing List
    • Paper Pumpkin
    • YouTube

Great Teacher Gift!

May 18, 2015
Project Pics· Tricks of the Trade

18 May


I've been making 3" x 3" Post-It Note holders for my hostesses at clubs this month.

(I forgot to take any pictures of those!)


But for my last club, I RAN OUT of them and didn't realize it or mis-counted or something.


I still needed another project!


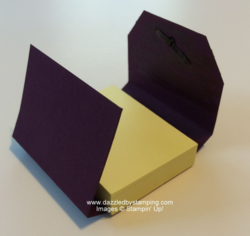
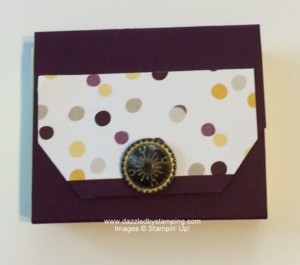
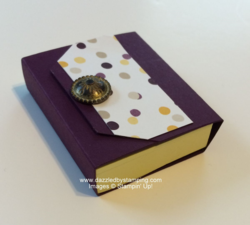
Here's what I came up with.


Post-It Note Holder, Moonlight DSP Stack, Angled Topper punch, www.dazzledbystamping.com

This is one for the 1 1/2" x 2" size Post-It Notes!


And guess what.

The Angled Topper punch works perfectly for this size!


Post-It Note Holder, Moonlight DSP Stack, Angled Topper punch, www.dazzledbystamping.com Post-It Note Holder, Moonlight DSP Stack, Angled Topper punch, www.dazzledbystamping.com


So here's what you need:

  • Cardstock: 2" x 5 1/2"
  • DSP: 1 7/8" x 1 1/4"
  • Score cs at 1 1/2", 2", 3 1/2", 4"; crease score lines well.
  • Attach DSP to one end of cs strip, not quite to the edge.
  • Insert that end into the Angled Topper punch and punch the angle.
  • Insert [an Antique Brad] into the punched hole and flatten the stem securely in back.
  • Attach a small piece of velcro strip or dot to the same side/end as the Antique Brad.
  • Attach the Post-It Note pad to the center panel of the cs strip.
  • Close it up, and it's ready to travel! 🙂


If you who saw or like the 3" x 3" size better…here are those measurements:

(I made this matchbook-style…stapled the 1" end tab down and tucked in the 3 1/4" x 3 1/4" panel into it.)


  • Cardstock: 3 1/4" x 8 1/2"
  • Score at 3 1/4", 3 3/4", 7 1/2"


I just decided…I'll make a 3"x3" one with the new In Colors for tomorrow.


See you then!


Have a great week!


Remember, if you can fall in love with a project, you can learn to create it! Here to help you channel your inner Creative Genius…


Steph


LIKE me on Facebook.

Follow me on Pinterest.

Subscribe to my FREE newsletter, and receive my "5 Tips for Making Fabulous Hand-Stamped Creations."
 

Leave a Comment

Previous Post: « Build a Birthday
Next Post: Round 2! »

Reader Interactions

Leave a Reply Cancel reply

Your email address will not be published. Required fields are marked *

Primary Sidebar

Meet Stephanie

I'm a stamp & go kinda girl!

read more

Current Catalogs

Stampin' Up! 2025-2026 Annual Catalog
May 6, 2025 - May 4, 2026
View Online | Shop Online

All content on this blog is the property of Stephanie Flath, Stampin' Up!® Independent Demonstrator.

Classes, services and projects offered here are not endorsed by Stampin' Up!® Projects, videos, photos, ideas and articles are shared for personal use only and may not be removed, duplicated or copied without permission

Copyright © 2025 Stephanie Flath · Theme Customisation by Catherine Carroll