Happy Monday, People!!

I have instructions for you today for this bag I showed you Friday, but first let me tell you how awesome these Petite Cafe Gift Bags are!!
They are:
- pretty heavy duty–AND POLY-LINED so you can even gift your ooey-gooey Christmas treats!
- almost 3 1/2" wide; almost 2 1/2" deep; and 8" tall, before folding down to close.
- perfect for ANY occasion!
So I couldn't find from where I found my original inspiration. Sorry!
Custom Window Gift Bag:
- We sponged a starry design on our bag with Sponge Daubers, Crumb Cake and the Hearts & Stars Decorative Mask. (Lay the mask over the bag and sponge/daub/spritz through the star openings to decorate.)
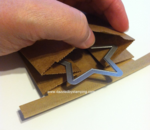
 Next insert the desired framelit into the gift bag CUT SIDE UP–AND making sure the framelit is between the "gusset" folds and the front layer of the bag. [See pic.] If you DON'T do this, you'll end up cutting a window into the folds/side of your gift bag.
 - Run it through the Big Shot with cutting mats and the Magnetic Platform or Multi-Purpose Platform with both tabs down like usual for framelits.
- "Seal" your window from the inside with a Window Sheet and Sticky Strip. For ours–because of our desired off-centered placement of the
 window–we only lined 3 edges of a 3"x3" Window Sheet.
 - Have gift bag open and peel backing off the Sticky Strip and insert window sheet with the Sticky side toward the front. The non-lined edge should be on the side where there's not much room by the edge of the bag. Otherwise, the Sticky Strip will be sticking out of the window.
- Finish off your gift bag with more embellishments as desired. We used the Bright & Beautiful stamp set with Cherry Cobbler and Early Espresso.
We had FUN making these bags!! Have fun with yours, too!!
You can order them here.
Have a great week!!
Remember, if you can fall in love with a project, you can learn to create it! Here to help you channel your inner Creative Genius…
Steph
LIKE me on Facebook.
Follow me on Pinterest.
Subscribe to my FREE newsletter, and receive my "5 Tips for Making Fabulous Hand-Stamped Creations."
Leave a Reply