Another song going through my head, but that one's a little more recent. 🙂
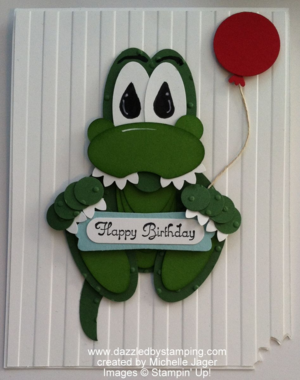
So here's the winner of this year's Card Contest:
From Michelle Jager
Congratulations, Michelle!
I appreciate all the work that you and all the other participants put into your cards for the Card Contest.
I love seeing everyone's work!
And it made me happy to find out that the Contest was one of the favorite parts of the Hostess Appreciation Party. (I KNOW I always love it! Glad you do, too.)
One more thing to share….
Do you recall that a YEAR AGO, 3 days after my HAP, I left for Florida to help my sister who was having her 4th baby?
(Kinda funny….I pulled up my party plans from last year to work on this year's HAP. There were 2 columns on my "to do" list–BEFORE HAP and BEFORE FLORIDA. 🙂 Then I was looking for something and went back and read my blogpost from when I got back home from Florida; it made me cry all over again.)
Ok, so NO, I'm not going to Florida again this year.
But, this card IS on the way to Florida. (Shhhh! Don't tell Emilio!!)
He's turning 1 tomorrow!!
Can't.even.believe.it.
Oh! And MY baby is turning 16 Sunday!!
CAN'T.EVEN.BELIEVE.IT.
(Yes, if you do the "math", I missed her birthday last year. But she authorized it and forgives me. She calls Emilio HER baby. They bonded when he was here this year.)
Teresa sent me some pics of him swinging (at the park?). He's such a cute peanut!
I already told Michelle I was sending the card off to him. [That's right. I get to keep the cards from the Contest. 😉 ]
I thought he and his siblings might like a new lil friendly guy.
Anyway, just thought you might like to hear about my buddy.
I like him. I think you might, too. 😉
I have one more HAP project to share Monday.
Thanks for hangin with me all week!
Have a great weekend!!
Remember, if you can fall in love with a project, you can learn to create it! Here to help you channel your inner Creative Genius…
Steph
LIKE me on Facebook.
Follow me on Pinterest.
Subscribe to my FREE newsletter, and receive my "5 Tips for Making Fabulous Hand-Stamped Creations."

That is an awesome card! So glad it's coming our way!!
🙂 Have a great birthday party!!
Are there any hints on how to make this cute little critter? Love it!
Mary Kay, these are my guesses; I'll try to confirm with Michelle:
Start with 2 oval punches that fit inside each other; it looks like she used the current "large" oval #119855 along with the retired "small" oval. It fits right inside.
These ovals were used for:
eyes/eyelids, snout, feet/feet pads, belly scales–graduated as needed, tail–punch once to round it out; then punch on scrap right next to it to get a rounded strip/tail.
1/2" circle punch for cheeks and "fingers"
Boho Blossoms punch for teeth and claws
Modern Label & Word Window punches for sign
1" circle and Owl Builder (feet only) punches for balloon.
Teardrop eyes and eyebrows were drawn with marker; along with white gel pen for "light" in the eyes and on the snout.
Can use punch or Paper Snips to round out a section on the bottom of the snout.
Sponging some of the edges of punched pieces helps add definition and CUTENESS! 😉
Perfect Polka Dots embossing folder for texture.
Have fun!!
It is all correct except I used the owl punch for the circles for his cheeks and fingers. I believe they are just a touch bigger.
Thank you, Michelle!