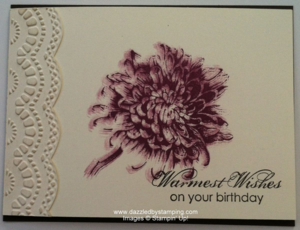
I thought I'd start this week out with a simply gorgeous card that has a couple easy twists.
When I learned the first several years ago, I was told the technique was called "The Donna".
I've heard it called something else recently, but I can't recall what it was. I probably put it out of my head, because I loved the name that I knew so well.
That's because "Donna" called it that after creating beauty out of her mistake–of DROPPING her stamp right on her project.
We've ALL done that, right?!?!
RIGHT!
Well, first here's the card. Then I'll explain:
Do you see how the flower (from Blooming with Kindness) is "smudgy"?
It's actually stamped several times without reinking.
We made this card at my Stamp-a-Stack a week and a half ago.
And for some reason, everyone seemed to be a little nervous to try it!
But you know I always have my tables covered with paper–so a little practice on scrap, and they were on their way as pros!
Here's "The Donna"
- Ink up your stamp well. (I think it helps having a stamp that is larger and/or bolder, so re-placement of it doesn't matter quite so much. Also, obviously the darker the ink choice, the more dramatic the results.)
- Stamp once as desired with good, normal pressure. (BUT DON'T LIFT YET without thinking ahead.)
- Now lift the stamp–just barely–and start tapping it back down several times. Most likely you wouldn't end up in exactly the same spot every time anyway. But I also rotate my stamp back and forth very slightly (still level with the table, but turn to the right or left.)
- I'D ALSO LIKE TO MENTION AT THIS POINT….the TAPPING rhythm/method just described?…. is HOW YOU SHOULD TAP the NEW FIRM FOAM INK PADS to ink up your stamps!! 😀 That makes me realize we might have to do a "Donna" card at my clubs soon!!…NOTE TO SELF….
- THE RESULT is an image that looks smudgy–one very bold image with shadow behind it. Simply gorgeous.
Ok, so here's the other twist I'd like to mention on the card.
Even in person, my class attendees didn't catch this until I pointed it out.
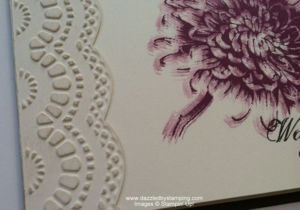
I wanted some embossing on the inside edge, and I wanted it to stand out a little.
I used one of the Delicate Designs embossing folders. (The whole folder is approx 2 1/4" wide.)
Well, I couldn't get the folder in where I wanted it very successfully and then have it go through the Big Shot well.
So I cut a 1 1/4" x 4 1/4" piece of Very Vanilla and just put that in the folder.
I cut around the scallops of the design with Paper Snips and sponged it with Crumb Cake ink.
It becomes the perfect embossed accent for our simply gorgeous card. Just attach with your favorite adhesive.
Other colors on our card were Rich Razzleberry and Early Espresso.
I hope you enjoyed "The Donna".
Have a fabulous week!! Enjoy the gorgeous sunshine and warming weather!!
Woo-hoo!!!! Love it!!
Remember, if you can fall in love with a project, you can learn to create it! Here to help you channel your inner Creative Genius…
Steph
LIKE me on Facebook.
Follow me on Pinterest.
Subscribe to my FREE newsletter, and receive my "5 Tips for Making Fabulous Hand-Stamped Creations."


Love this card!!
Thanks, Mary Kay! It seems like ANY card made with this set turns out beautiful!! There's just something about it. 🙂 Glad you like it!